Friday, December 24, 2021

Epilogue ARC Progress - Monokote (wing/stab bottoms)

Okay, just finished Monokoting the wing and stab bottoms.   I'm going with a basic hopefully very visible color/scheme layout. Cub yellow-based schemes with dark contrasting colors dark red and black are visible to me in most sky conditions.  The exception are those cloudless blue sky conditions.  This is where dark red on the fuse and on top of the wings and stabs becomes beneficial. To me, light red, blues, and white are difficult to see at distance and at times can become invisible in certain orientations. 

I'm in the process of deciding between two different scheme layouts for the top of the wings and stabs. I hope to have the Monokote work completed in the next few days.


Wing and stab bottoms


Various tools used for Monokoting


Wednesday, December 1, 2021

Epilogue ARC Progress - paint (step 3 - black)

Okay, the final masking and painting of colors are behind me.  With the effort and man-hours, I've logged so far on this project I have a greater appreciation of purchasing a custom-painted ARF. So far I am very happy with the results. Next steps involve wet sanding then applying clear coat.

Step 3 - black


Tuesday, November 30, 2021

Epilogue ARC Progress - paint (step 2 - red)

Spent the morning prepping for step 2, shooting red by reverse masking over the yellow and areas that will be painted black.  With just one more color to shoot I can now see the finish line ahead. This scheme is simple, designed to be functional, not to win a beauty contest.


I plan to wet sand and buff the paint prior to clear coating with 2k High Gloss ClearCoat ou of the can which I just ordered thru Amazon.

Step 2 - red


Monday, November 29, 2021

Epilogue ARC Progress - paint (step 1 - yellow)

First and foremost let me say I really do not like the painting process.  Compared to Monokoting there are way too many steps to achieve the desired finish, risks to one's health, along with potential property damage if you don't have a paint booth. 

My paint selection is based on ease of application and the ability to match Monokote which I prefer to use on the wings, stabs, and rudder.  On my last paint project, Invitation G2 ARC I chose Wings West which I will be using on the Epilogue  They offer Monokote matching colors in 4oz sizes that are ready to spray.  I do regret not ordering white primer from Wings West.  The gray primer I used on the seams, around the nose ring and canopy areas required more paint then expected to cover.  Oh well live and learn. 

This paint does require clear coating.  The finished result of the Invitation was light, the RTF weight is 4890g, although I chose not to spend time and effort wet sanding and polishing.  With it being fall leading to winter with limited flying opportunities I plan to put forth the effort on the Epilogue to sand and polish after clear coating to remove imperfections and increase the luster of the paint.

Color scheme plan

Step 1 - yellow


Monday, November 15, 2021

Sun Fli IV update

Basic airframe including radio install, fuel tank, and landing gear completed.  Next is final sanding before applying Monokote.  The scheme will consist of my traditional colors of red, yellow, and black.  Covering will start after completion of the BJ Craft Epilogue currently on the bench.

Wing construction

Tail sections

Assembled airframe


Tuesday, November 9, 2021

SE Texas fall pattern practice

This time of year the weather is perfect to spend time outdoors especially in SE Texas. With the absence of the hot summer heat making the air turbulent, the conditions both dawn and near dust are ideal for practicing,  testing, and making tweaks to new/old, pattern equipment.

After experiencing the improved flight characteristics in my EPIC Evo and Invitation G2 with the D3 ESCs I chose to reach back and update the ESC in a reliable competitive platform, Epic+ with Adam Debowski's D3 controller too.  The results are amazing.  When a non-pattern flying club member on the sidelines comments, "how are you able to achieve similar downline airspeed as your upline airspeed", pretty much confirms the upgrade was worth it. Yesterday and today I logged several flights, fine-tuning setups on the D3 equipped Epic+ which first flew in  2018.  I am pleased the upgrade from the Castle HV 85 Lite and setup changes were worth the effort. I am excited in logging more flights to this Hacker C50 14XL powered airframe now with the D3 and improve its competitiveness even more

The following picture was taken at the SPARKS RC Club 10092021 ~5:00pm


Friday, October 22, 2021

Epilogue ARC Progress - battery tray

How and where to install a battery tray can be tricky.  Over the years I've witnessed multiple inflight battery ejections as a result of poor tray design, installation execution, or the use of low-grade velcro to secure the battery to the tray. Three basic practices I follow when designing a battery tray are: 1) Secure tray to landing gear mount 2) Secure battery to the tray using a screw-down locking method, not velcro 3) Tray must be removable to allow servicing the tray or other components.

The following pictures show the various parts of the tray I designed plus the final installed position.  I used Fiberglass/Honeycomb Sandwich Panels from ACP Composites for the tray floor, locking plate, and circular screw hold-downs.  This material is lighter and much stronger than traditional plywood.  The tray floor is attached to graphite tubes using  2-56 screws with blind nuts. The tubes are then secured to the fuselage sides with F3AU's Battery Tray Bracket Kit. I added dowel hardpoints wherever screws passed thru the honeycomb panel plus reinforced those areas with 1/64th plywood.  Hysol epoxy was used to attach the F3AU bracket mounts to the fuselage.

Very please with how the tray turned out.  It is fully removable, very strong and durable, and firmly attached to the fuse sides and landing gear formers with a single screw located near the center of the tray floor.  When this screw is tightened the floor rests on the gear mount formers which will prevent the tray from rocking or flexing during inflight G loads. The total tray weight is 58 grams.


Tray Components


Tray Underside

Lockdown Undersides

Tray Location


Saturday, October 2, 2021

Epilogue ARC Progress

 Epilogue progress:


Scrubbed/washed the fuse to remove mold release. Applied filler and primer to the seam then wet sanded smooth to touch. Fitted servos in the wings and stabs plus the rudder in the fuse for pull-pull. Used the dremel router attachment to route slots in the ailerons, elevators and rudder to accept carbon control horns. I have elected to outfit the wings with traditional balsa tips instead of the supplied carbon wing tip plates.


Next step is to approximate where to position the motor battery tray.  This involves assembly of the airframe components with the motor batteries shifting them fore and aft to determine the cg range of 200 to 260mm measured from the wing’s leading edge. It’s not surprising to have such a rearward cg option with swept wings. Plan is to try using the removal battery tray system marketed by F3AU.


Monday, September 13, 2021

EPIC Evo's first pattern contest

The Fort Bend RC club hosted its third annual pattern contest this past weekend. The weather cooperated for the most part with partly cloudy skies, moderate temperatures, and humidity for September in SE Texas. Winds were direct crosswinds that varied slightly North vs.South all weekend making flight direction pilot's choice throughout the weekend

Leading up to this event I had been working on refining setups on my CA Models EPIC Evo. After redoing the wing and stab alignment and shifting the CG a bit more forward I felt the plane was tracking better in level flight plus up and down lines.  Overall the Evo appeared more locked, especially in windy conditions.  It was time to test its ability in a competitive situation.

In round one I was caught off guard by not flying with enough energy to overcome the crosswind.   The plane was blown-in resulting in making dramatic adjustments to reposition my flight path resulting in score downgrades that were deserved. In the subsequent flights, scores improved by flying with more energy overall.  The D3 Governor is amazing in the way it responds to help manage airspeed during both up and downlines in unfavorable conditions.  Unlike ESC's I've used in the past the D3 there is no need to throttle down as much in windy/crosswind conditions the D3 senses the prop is unloaded in a downline and braking occurs by the governor regulating RPMs relative to the transmitter stick position. The ah-ha moment for me was discovering not having to reduce the throttle as much as I would in more favorable wind conditions. At this higher rpm stick position, braking still occurred on downlines and carry more energy thru a bottom radius.  When establishing level flight the D3 senses the loaded prop and responds by increasing the RPMs relative to the stick position.  The D3 makes it easier to control energy and pace in windy conditions.

It was a successful weekend. I learned a bunch about how to fly in direct crosswinds and power management with the D3 Governor. Despite a slow beginning, I was fortunate to come away with the win.

Fort Bend Contest Results


EPIC Evo details:

  • Radio - Futaba 32MZ / 7108rx
  • Servos - HV digtal
  • Motor - Hacker C54
  • ESC - D3 governor 
  • Prop - APC Carbon 22x13
  • Spinner - Falcon
  • Batteries - motor TP 10s 5000 / RX TP 2s 910
  • Landing gear - Falcon
  • RTF weight - 4756grams


Saturday, August 28, 2021

BJ Craft Epilogue (ARC)

 In May of this year, I took delivery of a BJ Craft Epilogue ARC from F3AU. Upon unpacking the contents I was surprised by the shape of the rudder.  The rudder incorporated a counterbalance similar to my Invitation G2. This was unlike pictures I had viewed of the Epilogue to date online. In addition, there was a nose ring attached to the exterior of the original molded nose ring which had a noticeable change in the right and down thrust amounts. As I continued to unpack components I quickly noted the double taper of the wings and stabs and general location on the fuse were what as I had expected.  Concerned about the rudder shape and nose ring thrust modifications I sent an inquiry to F3AU and BJ Park. The following is the response I received direct from BJ Park about the design changes.

From BJ Craft:

I am BJ Park, owner of  BJ Craft. I am very sorry for giving you trouble and confusion. If you do not like changed design, you can return the plane, the return cost shall be paid to Mike by me. English is not my mother tongue and culture barrier shall be, I may commit indecent act  in the text, please understand and forgive me.

I am going to say about the modification of the design. I have a mistake that I did not inform this to Mike. Sorry for Mike. I am engineer rather than business man, so I commit mistake like this case Especially when I develop new models. please understand this mistake. The reason that I change vertical fin is 3 causes. 

1. The height  of wood crate is determined by the height of the vertical fin. As you know well I ship plans all over the world air shipping by UPS/DHL  Reducing the height of Fin,  wich can save USD600~800/pc. You can see if you check freight in their home page. This is very important element for dealers.

2. Epilogue's counter balance. Feed back from world wide about 1st. lot  production, rudder to aileron mixing is no need or recovery a bit. To reduce recovery, counter balance is,  it  pushes top of the rudder post when you use rudder, due to pushing makes counter recovery roll. It is not  big, reuces mix about 1%.

3. Height of fin in Nuance G2 and Epilogue has higher fin at first lot, that is "new spec" design. this is the spec about design coefficient for aircraft plane form (geometry) which is related with pattern trackng. Epilogue is 2020 versoin of 'new spec" which includes stability (tracking) in 8~10m/sec strong cross wind. 1st  lot  of  Nuance G2  was old version it was 6~ 8m/sec strong cross wind. In the 2nd lot  of  Nuance G2  improved into 2020 version. I realized that feedback from worldwide has a margin to improve. To match 2020 version tail (horizontal, vertical) volume coefficient, vertical fin height of 1st lot Nuance G2 is necessary to highten. This improvement can't  be felt by the fliers who fly the plane in the not srong wind. The improvement that I do in detail may not necessary for the common fliers in worldwide but aircraft designer test and understand those in detail for future technology. The improvement of performance is important but more important is customers' needs.

P.S. : Epilogue in the F3AU pic is the epilogue  prototype which is flown by me WC in 2019. This plane is deigned only for me, my flying style and my propulsion. Drive unit for this plane is 22*16 prop runs at 7000RPM (4000w) this is used only by me in the world. Unique plane makes unique flying possible. unfortunately it needs unique design. Production Epilogue lot was redesigned for common fliers and popular propulsion in the world,even if it is not perfect one but can be satisfied worldwide

The plane perfetly fit to your flying field only is able to be easily designed by me, but your flying field is the micro part of the world, my design is flown in the fields from 0~3000m above sea level, besides this, many elements give effect to the aircraft design. So my design is not perfect  but is stisfied all over the world and prototyhpe and production type is different from each other.

Canalizer for prototype is only one ( wrong design too small) so I changed it into present one. Anhedral for big prop was also deleted. Wing fence in the pic was changed into wing tip fence, which can be easily changed larger or smaller depending on the customer circumstances. Besides these, the moment, wing position ( I like low wing) tail volume etc, etc.

I should have provided the production type picture, due to various reason I couldn't, it was my mistake. Story was long, F3A market is so small that  factory couldn't employ enough workers. But I am doing my best to do all the things as long as I can.


Rudder configuration BJ referenced of his WC 2019 version


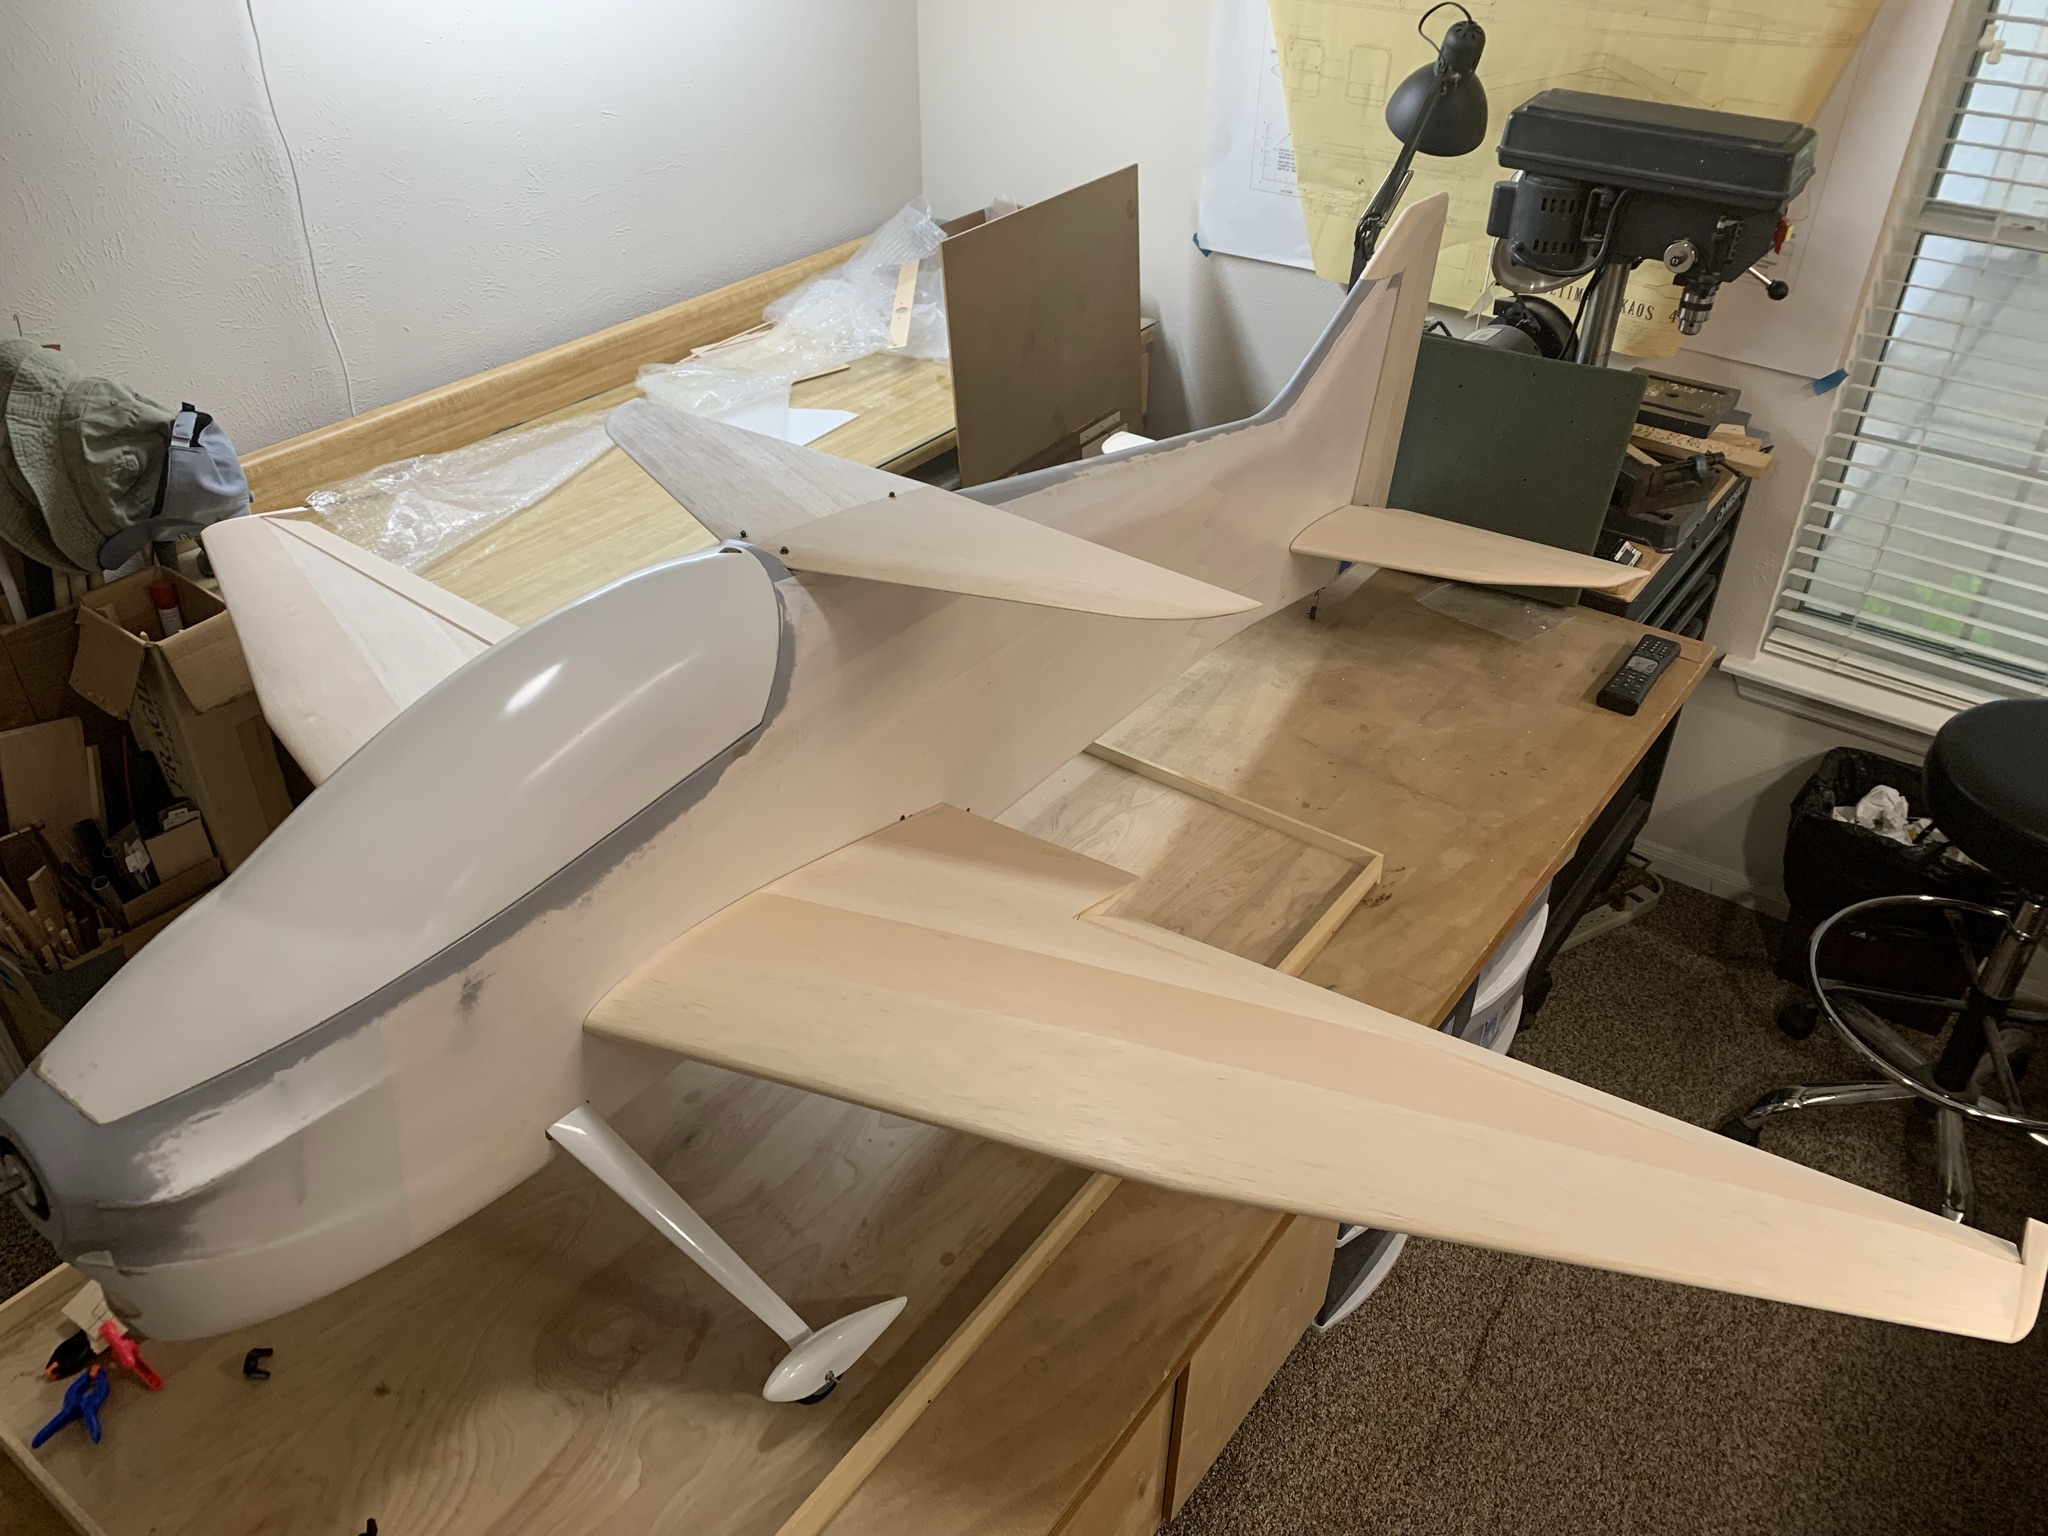
Rudder shape of the version I received.


After inspecting the entire ARC kit contents, overall I am very please with the weights, fit and finish like I was with the Invitation G2 ARC.  I've begun working on the Epilogue starting with reinforcement of the gear plate with a Carbon Fiber/Nomex plate with dowel hardpoints for the blind nuts plus installation of the Hacker C54.